Circuit Playground Express
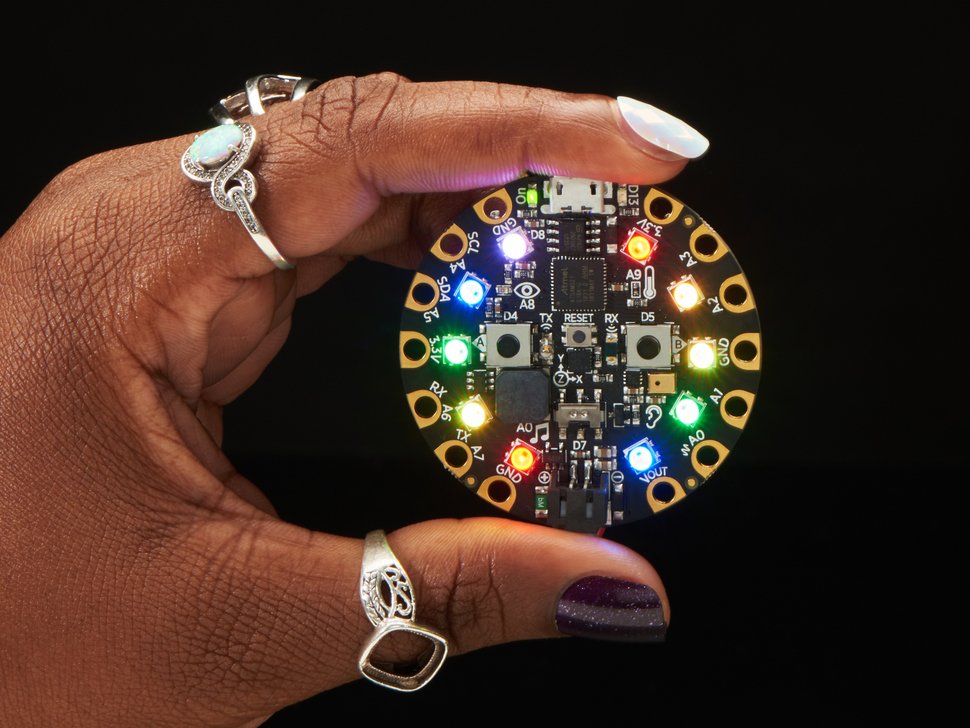
Computers come in all shapes and sizes. The Circuit Playground Express (CPX) is a "microprocessor," a computer that, compared with a full computer, is somewhat reduced in its features, speed, or performance.
We're going to be using your laptop computer to program the CPX, which can then run the program on its own.
You'll have a number of different options to experiment with in programming your CPX.
Let's get started!
Flash Drives and Text Editors
- Take a CPX and plug in the USB cable between the device and a USB-A port (or adapter and USB-C port) on your computer. When you plug the device in, it may start flashing some of its LED lights—it's using the power from your computer to run the last program that was installed on it.
The CPX appears on your computer as a flash drive called "CIRCUITPY." If you open this drive, you'll see a small number of files and folders. The CPX can only hold a single program at a time, and the file for that program is calledcode.py. - Open the
code.pyprogram with VSCode or some other text editor and you can start editing that program immediately. Any changes made to this file, when saved to the CPX, will automatically start running on that device.
Saving Programs
Because the CPX only runs a program if it's called code.py, if you want to save multiple CPX programs, you'll have to give them new names. You can "Save-As" any program on your computer with a more descriptive name (like blinkenlights.py or scary_witch.py). But when it's time to run that code on the CPX, you'll have to rename it to code.py on the CPX after you upload it.
The CircuitPython language
The CPX runs a variant of Python called CircuitPython, which is a small programming language that makes use of the Python syntax. If you've programmed in Python before you'll recognize the format of CircuitPython statements.
- def function():
- x = 7
- if, if-else, if-elif-else
- for i in range(x):
- while x > 10:
You'll be entering and manipulating code today to see how it works on the CPX!
The CPX Input/Output interface
You've got a CPX plugged into your laptop, you've certainly noticed that the device itself has no keyboard for input and no screen for output. The CPX gets its input from various sensors and input ports that are on the device itself, including a slider switch and two buttons. We'll see how those work soon.
Output can consist of a red LED light and ten "neopixels"—powerful, programmable LED lights that encircle the CPX. There's also a very small speaker installed on the CPX that you might use.
For the CPX to be able to run programs, it also needs some libraries that are imported so we can interact with the CPX's buttons, sensors, lights, etc.
Let's run through a few tutorial programs to get acquainted with the Circuit Playground Express.
Programs
Each of the programs given here is a complete, working program, with comments in the code describing the various lines, as well as comments at the top of each example explaining what the program does.
How to Learn Circuit Python
- Don't just copy-paste these programs. Type them in by hand so you can read the code while you're typing it.
- If you're typing straight into the
code.pyfile on the CPX, when you "Save" the program it will automatically start to run. - If the program doesn't work the way it's supposed to, you've got some debugging to do.
- If the program works just the way it's supposed to, try making a couple of small changes to the program to experiment with it and see what happens.
- When you're ready to move on to the next program, do so!
1. Getting started
You can write functions for your programs, but the only program that is ever running on the CPX is code.py, so you don't need to write a main() function. Just put the code directly into the program.
"""
This example turns on the little red LED.
(The green LED indicates power on the cpx.)
"""

# import the libraries needed
from adafruit_circuitplayground import cp

"""
All CPX programs require an infinite loop
to repeatedly run through the instructions
in the body of the program.
"""

while True:                 # infinite loop
    cp.red_led = True       # turns on the red_led
                            # on the cpx
Save this programs as code.py onto the CIRCUITPY device attached to your computer. After a moment to transfer the program onto the CPX, you should see the red led light up.
Yay! That's a program! Let's try another one.
2. Blinky
Here's a small variation that uses a timer.
"""
Blinky program flashes the red led
"""

# import the libraries needed
from adafruit_circuitplayground import cp
import time

while True:
    cp.red_led = True       # light on
    time.sleep(0.5)         # hang out for half a second
    cp.red_led = False      # light off
    time.sleep(0.5)         # wait for half a second
Save this programs as code.py onto the CIRCUITPY device attached to your computer. After a moment to transfer the program onto the CPX, you should see the red led blinking.
Figure out how to make the light flash more quickly or more slowly.
There are a few switches/buttons that you can program on the CPX. Take a look at this program that uses the slide switch on the board.
3. Slide switch
"""
Demonstrates coding with the slide switch
"""

# import the libraries needed
from adafruit_circuitplayground import cp
import time

while True:
    if cp.switch:                  # if the switch is "on" (to the left)
        cp.red_led = True          # turn on the red LED
    else:                          # otherwise...
        cp.red_led = False         # leave the LED off
So... how can we combine these two? As long as the slide switch if one, blink the light...
4. Switch Blinky
"""
Demonstrates using slide switch with blinking
"""

# import the libraries needed
from adafruit_circuitplayground import cp
import time

while True:
    if cp.switch:                  # if the switch is "on" (to the left)
        cp.red_led = True       # light on
        time.sleep(0.5)         # hang out for half a second
        cp.red_led = False      # light off
        time.sleep(0.5)         # wait for half a second
Sound
The CPX has a very small, low-fidelity speaker that can play sounds of a given frequency, or even small sound files.
Here we build a simple "Annoy-a-Tron," which emits a high-pitched sound at random intervals.
Run this program, connect the CPX to its battery pack, and hide it away someplace... and watch it drive people crazy. >:-)
5. Annoy-a-Tron
"""
Annoy-a-tron
Based on the old ThinkGeek Annoy-a-tron.

In testing, the while-True CPX loop runs at a frequency
of ~2500 Hz. So something that happens on average
once every 2500 times would happen on average once per
second. In subsequent testing, loop seemed to run faster?
Adust LOOP_FREQ as needed.


"""

from adafruit_circuitplayground import cp
import random
import time

LOOP_FREQ = 5000    # approximate times while-loop
                    # runs in 1 second
BEEP_FREQ = 1/60    # once every 60 seconds

while True:
    if cp.switch:
        # print("Slide switch off!")
        cp.stop_tone()
        continue
    else:
        if random.randrange( int(LOOP_FREQ / BEEP_FREQ)) == 0:
            cp.start_tone(10000)    # near the upper freq limit for speaker
            time.sleep(0.10)        # play for a moment
            cp.stop_tone()
Colors
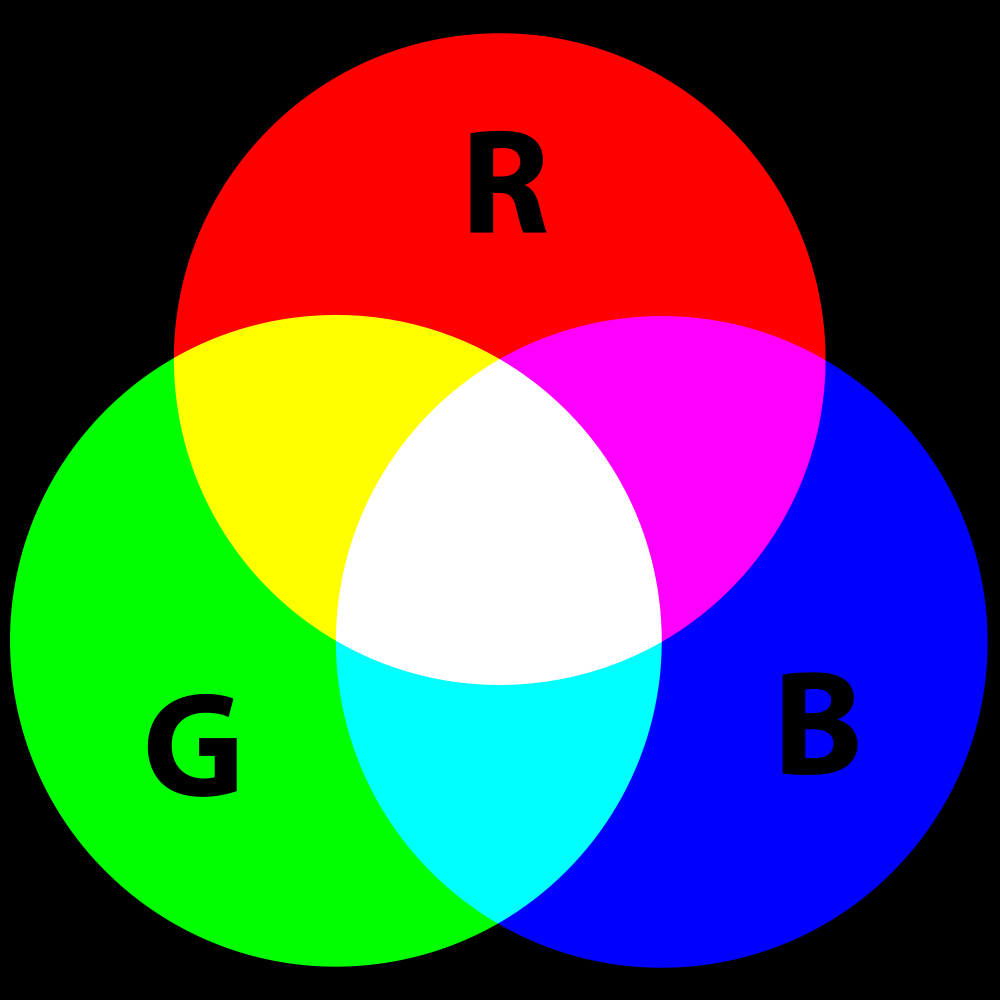
Colors in computers are often represented as a combination of Red, Green, and Blue (RGB) values, with each of those colors indicated by a value in the range 0-255, where 0 is completely dark and 255 is maximum brightness. To indicate the brightest red color, then, you'd use (255, 0, 0) for (maximum red, no green, no blue).
  ( 128   ,    128    ,    0 )
    red   ,   green   ,  blue
    (red + green = yellow)
Multiple values in parentheses and separated by commas are called a tuple, and we can use them the describe colors, and light up pixels with those colors, on the CPX. Let's see how.
NeoPixels
There are 10 pixels around the edge of the CPX, numbered from 0-9. You can turn on all of the pixels to a given color like this. (Note that 128 is half-brightness for the pixels, and it's already very, very bright!)
"""
All pixels one color
"""
from adafruit_circuitplayground import cp

while True:
    cp.pixels.fill( (0, 128, 0) )
Because the pixels each have their own address, 0-9, we can turn them on individually as well:
"""
Light the first three pixel. Also, use the brightness method to control brightness.
"""
from adafruit_circuitplayground import cp

cp.pixels.brightness = 0.2  # 20% brightness

while True:
    cp.pixels[0] = (255, 255, 255)  # white
    cp.pixels[1] = (0, 0, 255)      # blue
    cp.pixels[2] = (255, 0, 0)      # red
Now let's try a more sophisticated program.
6. Light Chase
Try this program and see what happens! We're using two loops inside the main while loop to operate the pixels. The first one goes through all of the lights numbered 0-9, and checks to see if each one is in the list of lights to be turned on (lights). If it is, light it blue, otherwise, turn it off. Then we pause for 0.4 seconds, and finally we update that list of lights to a new set of values: instead of 0, 3, and 6, we'll now light 1, 4, and 7.
The mod operation % allows the light count to wrap around: if we were lighting up NeoPixel number 9, 9 + 1 is 10, and 10 % 10 is 0, meaning we'll now be lighting up light 0 again.
Try it out!
"""
NeoPixel Light Chaser
"""

from adafruit_circuitplayground import cp
import time

cp.pixels.brightness = 0.2    # 20% brightness

# Identify lights to turn on
lights = [0, 1, 2, 3]

while True:
    for i in range(10):             # 0 - 9
        if i in lights:
            cp.pixels[i] = (0, 0, 255)  # blue
        else
            cp.pixels[i] = (0, 0, 0)    # off
    time.sleep(0.2)                 # wait 0.4 seconds
    # advance all pixels
    for i in range(len(lights)):
        lights[i] = (lights[i] + 1) % 10    # wraps around
So we now have strategies for controlling out lights.
Sensors
We've seen out lights can produce output on the CPX. There are multiple sensor inputs that we can use to interact with the device as well. Let's see some demonstrations of those.
7. Candy Bar Watcher
Try this code and see how the covering the light sensor will change its values.
You'll need to download the hey_put_that_back.wav sound file and drag it onto your CIRCUITPY drive so that the code can play that file when needed.
Before you load the program onto the CPX, move the slide switch to the right ("off"). Once the sound file and the program have been loaded onto the device, put a piece of candy over the light sensor and slide the switch to the left ("on").
"""
Candy Bar Watcher
Put this code and the `hey_put_that_back.wav` file onto your
Circuit Playground Express. Plug the CPX into its battery pack,
and cover the light sensor with a small candy bar.

Oooooh! Scary!!!! :)

Happy Halloween!
"""

from adafruit_circuitplayground import cp
import time

cp.pixels.brightness = 0.3

def pulse():
    """Creates glowing pixels to draw attention
    to the trap!"""
    direction = +1   # could be - 1 too
    val = 1
    for i in range(200):
        '''pixels 5-9 are on the opposite side of the
        light sensor, so we can cover up the light sensor
        and not have the pulsing light interfere with
        light sensing'''
        cp.pixels[5:10] = ((val, 0, 0) * 5)
        # print(val) # for debugging
        time.sleep(0.005)
        # display value in plotter
        print((cp.light,))
        val += direction * 1
        if val > 100 or val < 1:
            direction = direction * -1

# Start main loop
while True:
    if cp.switch:
        pulse()
        time.sleep(0.2)
        if cp.light > 5:
            cp.play_file("hey_put_that_back.wav")
            time.sleep(2)
Accelerometers
The CPX has x-y-z accelerometers that can measure forces acting on the unit.
We can read those accelerometers and determine all sorts of things, including how the unit is being tilted, or whether or not it has been moved.
8. Halloween Pumpkin Witch!
Download the cackling witch sound file and put it onto the CIRCUITPY drive on your computer. Then load this program onto the CPX and see if you can figure out how it all works.
"""
Halloween Pumpkin Witch
Put this code and the `witch.wav` file onto your Circuit Playground
Express. Plug the CPX into its battery pack, and place the whole
thing at the bottom of a small plastic pumpkin with candy in it.

Oooooh! Scary!!!! :)

Happy Halloween!
"""

from adafruit_circuitplayground import cp
import time
import random

def flash():
    """Creates three flashes of light"""
    cp.pixels.brightness = 0.1
    for i in range(3):
        # turn LEDs 0-9 on at full white
        cp.pixels[0:9] = [(255, 255, 255)] * 9
        # wait a very short period of time
        time.sleep(random.random() / 10)
        # turn LEDS all off (0s are dark)
        cp.pixels[0:9] = [(0, 0, 0)] * 9
        time.sleep(random.random() / 10)

# Store initial x-y-z acceleration readings
x, y, z = cp.acceleration

# Start main loop
while True:
    # if switch is turned on
    if cp.switch:
        # save old acceleration readings
        oldx, oldy, oldz = x, y, z
        # wait a moment
        time.sleep(0.1)
        # get new acceleration readings
        x, y, z = cp.acceleration
        # compare the values with Pythagorean theorem
        difference = ((x-oldx)**2 + (y-oldy)**2 + (z-oldz)**2)**0.5
        print(difference)     # displays result in Mu serial window

        # randomly flash lights to attract attention
        if random.random() < 0.05:
            flash()

        # if acceleration values are different enough, the
        # pumpkin has been moved. Activate the witch!
        if difference > 0.9:
            cp.play_file("witch.wav")
            # get new acceleration values
            x, y, z = cp.acceleration